
Pickup from pallet
Parts are picked up from the Pickup pallet using the Combi gripper’s Suction-type, then transferred to the Centering table.
Panels
The panels below cover all the settings for the pickup operation.
Pallet panel
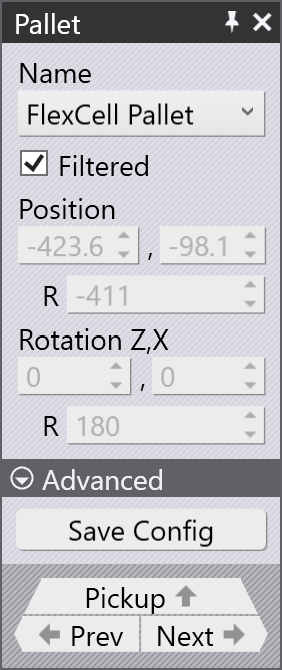
Use the Pallet panel to select a pallet and set its position in the cell. Click on the pickup pallet to open the Pallet panel.
-
Name: Lists pallets compatible with the current blank. To see all available pallets, clear the Filtered checkbox.
-
Position Z, X, R: These fields display the pallet’s position in the machine coordinate system. These fields are not editable, as the pallet position is preset.
-
Rotation Z, X, R: These fields display the pallet’s rotation in the machine coordinate system. These fields are not editable, as the pallet rotation is preset.
-
Save Config: Click the Advanced dropdown to view this option. Saves the current cell configuration as the default for this machine.
-
Prev / Next: Navigate to the previous or next pallet in the cell.
-
Pickup: Opens the Pickup panel.
Pickup panel
Use the Pickup panel to set the position of the blank stack on the pallet. Click the stack of blanks on the pallet to open this panel, or use the Pickup link in the Pallet panel. The Pickup panel has the following tabs:
-
Part settings (P)
-
Repeat grid (R)
-
Pickup sequence (S)
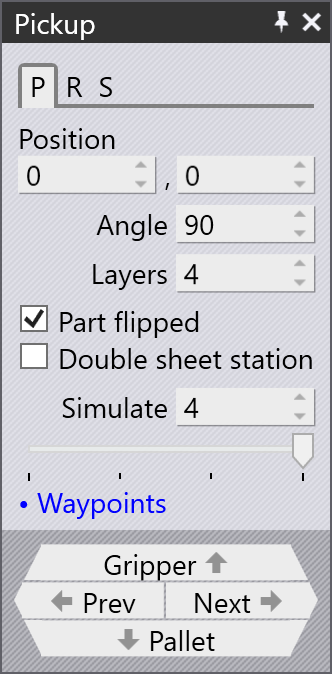
Part settings tab
-
Position: Sets the Z and X position of the part stack on the pallet.
-
Angle: Sets the rotation of the part on the pallet.
-
Layers: Sets the number of blanks in the stack.
-
Part Flipped: Flips the part so the other side faces up. An additional regrip is usually needed before the first bend; Flex Cell CAM adds this automatically.
-
Double sheet station: Enables the double sheet detection component. It helps to prevent picking up multiple sheets at once. Also this station can be used as a regrip station post bending.
-
Simulate: Selects which part in the stack to simulate (1 = top, 2 = second from top, etc.).
-
Waypoints: Opens the Waypoints panel to fine-tune the robot trajectory during pickup.
-
Gripper: Opens the Gripper panel.
-
Prev / Next: Navigate to the previous or next operation (Pickup, Centering, Bending, etc.).
-
Pallet: Opens the Pallet panel.
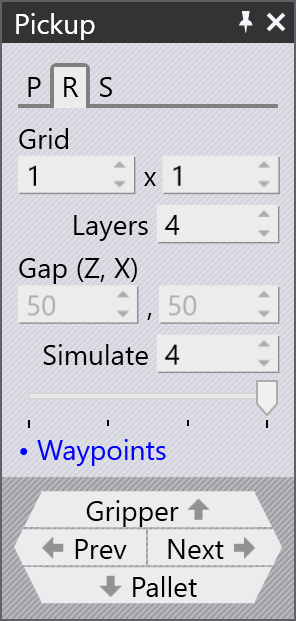
Repeat grid tab
-
Grid: This setting is used to set up the number of columns and rows in the part grid.
-
Layers: This setting specifies how many parts are stacked on top of each other in each pile.
-
Gap (Z, X): These settings are used to specify the gap between successive columns or successive rows. If you set this to 0, the rows or columns are exactly touching each other.
-
Note that parts are positioned along the pin locations. As grid (row, column) or part angle (rotation) is changed the 'Gap' is adjusted so the parts still align along pin loc ations.
-
-
Simulate: Selects which part in the stack to simulate.
-
Waypoints: Opens the Waypoints panel.
Pickup sequence tab
-
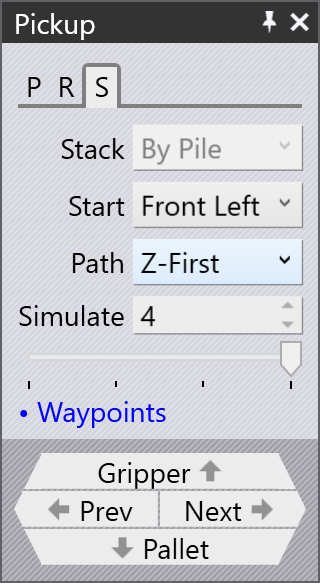
Stack: This By Pile setting picks up all parts from one pile before moving to the next pile.
-
Start and Path: These corner and path settings are used when there are multiple rows or columns, and decide which corner of the stack the pickup starts from, and whether the pickup then proceeds row-by-row, or column-by-column.
-
Note that if corner is set to 'Front Left', the initial part (part index 1) will be picked up at the top right corner of the pallet. This is because Flex Cell pallet is rotated 180 degrees in its default configuration.
-
-
Simulate: This setting (both the number spinner and the slider) can be used to scrub through the parts to see the order in which they are picked up. This is especially useful when adjusting the start corner and the path settings.
-
Waypoints: Opens the Waypoints panel.
Gripper panel
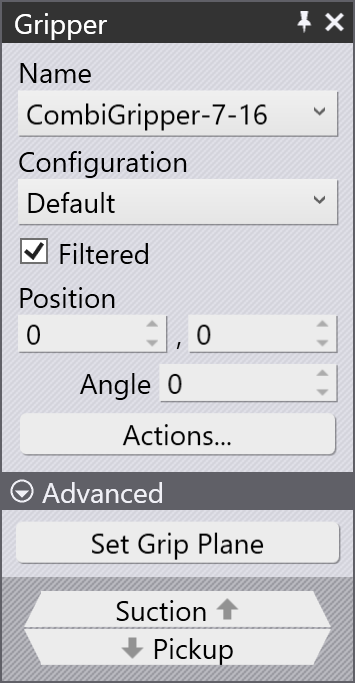
Use the Gripper panel to select a gripper or adjust the position at which it picks up the part. Click the gripper to open the Gripper panel.
-
Name: Lists grippers compatible with the current part. To see all available grippers, clear the Filtered checkbox.
-
Configuration: If a selected gripper’s suction cup parameters are modified, the modifications can be saved as a new configuration by selecting the SaveConfig option under Actions. This altered configuration can then be reused.
-
Position: Sets the Z and X position of the gripper relative to the part.
-
Angle: Sets the rotation of the gripper relative to the part.
-
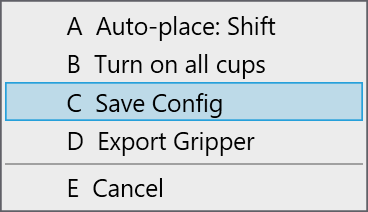
Actions: Opens a menu of gripper actions.
-
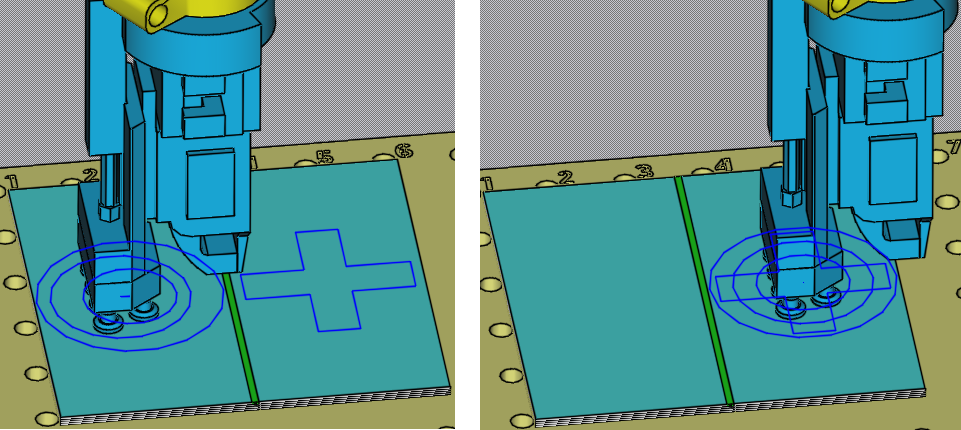
Auto-place: Shift: Repositions the gripper so all suction cups lie within the part and avoid holes (where possible).
-
Turn on all cups: Turns on all suction cups that are currently off.
-
Save Config: If you configure the gripper by turning off or removing some suction cups, or by changing the arm lengths or angles (for MultiGrippers that can change shape), you can save the altered configuration of the gripper with a new name, for easy reuse.
-
Export Gripper: Save the current gripper as .fxbgrip file that can be imported into another installation of Flex Cell CAM. This is useful if you have imported a custom gripper and need to share it with other installations.
-
-
Set Grip Plane: Changes the plane on which the gripper is positioned. By default the largest plane in the model is used. If you want to change the plane, click the Set Grip Plane, then click the desired plane in the simulation.
-
Suction: Opens the Suction panel to configure suction cups.
-
Pickup: Opens the Pickup panel.
Suction panel
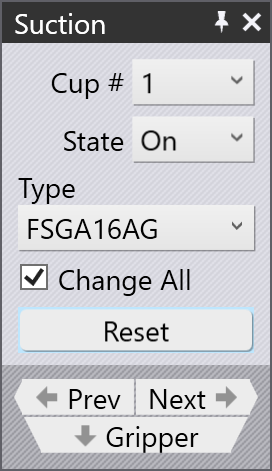
Use the Suction panel to configure the suction cup layout of a gripper. Click any suction cup to open this panel, or use the Suction link in the Gripper panel.
-
Cup #: Selects a suction cup to edit.
-
State: Sets each cup to On or Removed.
-
On: Default state. Cup is connected to the vacuum line and contributes to lift.
-
Removed: Cup is physically removed from the frame. There will be no lift from this cup and no collision occurs. It is useful when a cup falls over a formed feature or collides with the die.
-
-
Type: Changes the suction cup type. By default all cups change together; clear Change All to change individual cups. Note that all cups on a gripper frame must share the same working height.
-
Reset: Restores all cups to their default type and turns them all on.
-
Prev / Next: Navigate to the previous or next cup. The selected cup is highlighted in blue
-
Gripper: Opens the Gripper panel.